Quickstart
To quickly understand the workflow of clff package, let first start with a simple example. We will use the clff package to calculate the Phonon dispersion of Silicon, using either MD or DFT calculations. This example will show you how to make 'clff" work: set up the configuration file, launch the automated workflow, and GET the results. Other more sophisticated workflows, such as Concurrent Learning Interatomic Potential have the similar setup and launch procedures, then you can easily adapt without steep learning curve.
We will use LAMMPS as the MD engine and GPAW as the DFT engine.
First, we need to prepare the computing environment. In this example, we assume you are on Linux system, and use conda to manage the Python environment.
Install CLFF package
Install clff package in your local laptop or desktop computer.
conda create -n clff_env python=3.13
conda activate clff_env
pip install clff clff[phonon]
Example 1: Computing phonon dispersion with MD simulations
Prepare computing environment
Install LAMMPS in your remote computing cluster. You can follow the instructions on the LAMMPS website to install it on your system.
- For simplicity, you can install the pre-compiled version of LAMMPS in
condaenvironment:
conda create -n lammps_env -c conda-forge
conda activate lammps_env
conda install -c conda-forge lammps openmpi
PARAM.ymlfile as shown below
- For more details of the parameters, please refer to the Schema for Phonon calculation.
# Example PARAM.yml file for LAMMPS
stages:
  - make_structure                       # build initial atomic structures
  - relax_initial_structure              # relax initial structures
  - strain_and_relax                     # strain and relax the structures.
  - compute_force                        # compute the force
  - compute_phonon                       # post_process by phonopy

structure:                               # atomic structure information
  from_scratch:                          # build the structure from scratch
    structure_type: "bulk"               # bulk, molecule, surface,
    chem_formula: "Si"                   # chemical formula/element. e.g., "H2O", "Mg2O2", "Mg",
    pbc: [1, 1, 1]
    supercell: [1, 1, 1]                 # supercell size to build the structure,
    ase_build_arg:
      crystalstructure: "diamond"
      a: 5.43

calculator:
  name: "lammps"
  calc_args:
    lammps:                              # accept LAMMPS parameters
      file_potentials: ["SiC.tersoff"]   # path to the potential file
      auto_atom_names: True              # auto assign atoms in `pair_coeff` lines.
      pair_style: ["tersoff"]            # LAMMPS pair_style
      pair_coeff: ["* * ../SiC.tersoff"] # LAMMPS pair_coeff

optimize_args:                           # parameter to minimize the structure by MD (relax_type: 'min')
  lammps:                                # LAMMPS optimization parameters.
    ftol: 1.0e-9                         # force convergence criteria
    etol: 0                              # energy convergence criteria
    dmax: 0.001                          # maximum distance for line search to move (distance units). Default: 0.01
    mask: [1, 1, 1]                      # mask for cell relaxation. 1: relax, 0: fixed.

phonon:                                  # phonon calculation
  phonopy_arg:                           # Accept all the phonopy parameters
    supercell_matrix: [4, 4, 1]          # [4, 4, 1]  [1, 1, 1]. 1x3 or 3x3 list
    is_symmetry: True                    # use symmetry
    symprec: 1.0e-5                      # symmetry precision
  displacement:
    distance: 0.01                       # small displacement in Angstrom

  compute:                               # properties need to compute from the phonon calculation
    mesh: [20, 20, 20]                   # Set sampling mesh (set_mesh) in reciprocal space
    band_structure:                      # phonon band structure
      path_str: 'auto'                   # 'GXU,KGLWX' or 'auto' or None. k-path for band structure.
      npoints: 100                       # number of k-points
    dos: True                            # phonon density of states
    pdos: True                           # phonon projected density of states
MACHINE.ymlfile as shown below
- For more details of the parameters, please refer to the Schema for configuring the remote machines.
# Example MACHINE.yml file
lammps_1:
  machine:
    batch_type: Slurm                # Assume you are using a cluster with Slurm as the job scheduler
    context_type: SSH
    remote_root: /path/to/remote/workdir
    retry_count: 0
    remote_profile:
      hostname: your_cluster_IP_or_domain
      username: username_on_cluster
      password: password
      port: 22
      timeout: 20

  resources:
    number_node: 1
    cpu_per_node: 1
    custom_flags:
      - "#SBATCH --job-name=phonon"  # job name
      - "#SBATCH --partition=normal"

      - "can load your environment here, e.g., module load conda"
    module_list:
      - conda/lammps_env
    envs:
      NP: $SLURM_NTASKS

  command: "mpirun -np $NP lmp_mpi"
  submit_size: 8
Run the calculation
After finishing the above steps, you can run the clff workflow to calculate the phonon dispersion in your local computer.
conda activate clff_env
clff_phonon PARAM.yml MACHINE.yml
That's it!
clff will automatically prepare all things, submit jobs to the remote cluster, monitor their progress, and retrieve the results back to your local computer whenever they are finished, and then perform post-processing and visualize the phonon dispersion plot.
You can follow the progress of the calculation, and check the results in the output folders in your local computer.
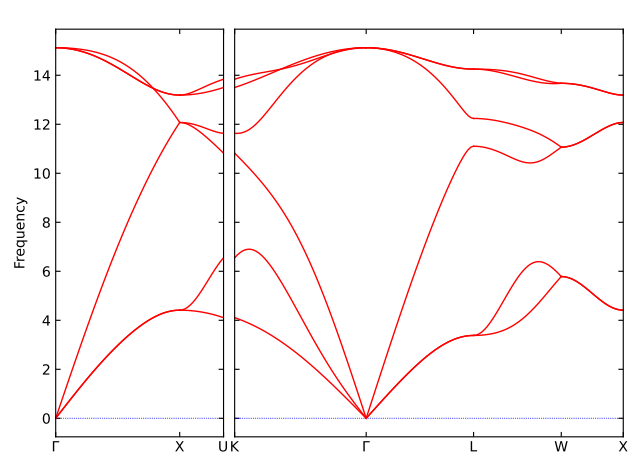
With above setting, you will get the phonon dispersion plot of bulk Silicon using MD simulation with a classical forcefield, like this:
Example 2: Computing phonon dispersion with DFT calculations
Prepare computing environment
Install GPAW in your remote computing cluster. You can follow the instructions on the GPAW website to install it on your system.
- For simplicity, you can install the pre-compiled version of GPAW in
condaenvironment:
conda create -n gpaw_env -c conda-forge
conda activate gpaw_env
conda install -c conda-forge gpaw openmpi
Prepare configuration files
Similar to the MD example, now you just need to modify the PARAM.yml file to use gpaw as the calculator
PARAM.ymlfile as shown below
# Example PARAM.yml file for GPAW
stages:
  - make_structure              # build initial atomic structures
  - relax_initial_structure     # relax initial structures
  - strain_and_relax            # strain and relax the structures.
  - compute_force               # compute the force
  - compute_phonon              # post_process by phonopy

structure:                      # atomic structure information
  from_scratch:                 # build the structure from scratch
    structure_type: "bulk"      # bulk, molecule, surface,
    chem_formula: "Si"          # chemical formula/element. e.g., "H2O", "Mg2O2", "Mg",
    pbc: [1, 1, 1]
    supercell: [1, 1, 1]        # supercell size to build the structure,
    ase_build_arg:
      crystalstructure: "diamond"
      a: 5.43

calculator:
  name: "gpaw"                  # choices: 'lammps', 'gpaw'. Calculator to calculate atomic forces. Default: 'lammps'
  calc_args:
    gpaw:                       # accept GPAW parameters
      mode:
        name: 'pw'              # use PlaneWave method energy cutoff in eV
        ecut: 500
      xc: "PBE"                 # exchange-correlation functional
      kpts:                     # if not set `kpts`, then only Gamma-point is used
        density: 7
        gamma: True
      convergence:              # convergence criteria
        forces: 1.0e-4

optimize_args:                  # parameter to minimize the structure by MD (relax_type: 'min')
  gpaw:                         # parameter to optimize the structure by DFT/MS (relax_type: 'opt')
    fmax: 1.0e-4                # force convergence criteria
    mask: [1, 1, 1]             # mask for cell relaxation. 1: relax, 0: fixed.

phonon:                         # phonon calculation
  phonopy_arg:                  # Accept all the phonopy parameters
    supercell_matrix: [4, 4, 1] # [4, 4, 1]  [1, 1, 1]. 1x3 or 3x3 list
    is_symmetry: True           # use symmetry
    symprec: 1.0e-5             # symmetry precision
  displacement:
    distance: 0.01              # small displacement in Angstrom

  compute:                      # properties need to compute from the phonon calculation
    mesh: [20, 20, 20]          # Set sampling mesh (set_mesh) in reciprocal space
    band_structure:             # phonon band structure
      path_str: 'auto'          # 'GXU,KGLWX' or 'auto' or None. k-path for band structure.
      npoints: 100              # number of k-points
    dos: True                   # phonon density of states
    pdos: True                  # phonon projected density of states
MACHINE.ymlfile as shown below
- For more details of the parameters, please refer to the Schema for configuring the remote machines.
# Example MACHINE.yml file
gpaw_1:
  machine:
    batch_type: Slurm                # Assume you are using a cluster with Slurm as the job scheduler
    context_type: SSH
    remote_root: /path/to/remote/workdir
    retry_count: 0
    remote_profile:
      hostname: your_cluster_IP_or_domain
      username: username_on_cluster
      password: password
      port: 22
      timeout: 20

  resources:
    number_node: 1
    cpu_per_node: 1
    custom_flags:
      - "#SBATCH --job-name=phonon"  # job name
      - "#SBATCH --partition=normal"

      - "can load your environment here, e.g., module load conda"
    module_list:
      - conda/gpaw_env
    envs:
      NP: $SLURM_NTASKS

  command: "mpirun -np $NP gpaw python"
  submit_size: 8
Run the calculation
Run the clff workflow to calculate the phonon dispersion in your local computer.
conda activate clff_env
clff_phonon PARAM.yml MACHINE.yml
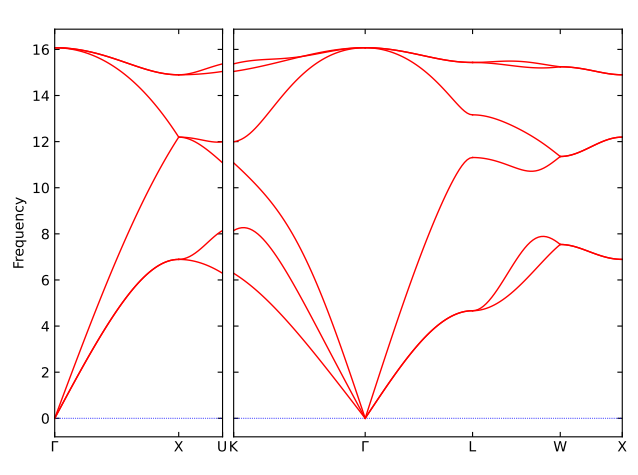
With above setting, you will get the phonon dispersion plot of bulk Silicon using DFT calculations, like this: